Graphics
The Graphics module provides access to all drawing related topics within the engine.
Because the Graphics module is the biggest and most powerful module it provides multiple sub modules for different
graphic related tasks.
Basics
This section describes the basic concepts and datatypes used when working with graphics in ScrewBox.
Coordinates
The Graphics module uses a pixel-perfect coordinate system based on an Offset
, which represents the distance from the upper-left pixel on the screen, Size, which is used to describe the dimension
of any screen-related object, and ScreenBounds, which describes the combination of both, an area anywhere on the
screen.
Sort order
Drawing sort order plays a major role when handling game graphics. Game objects should be rendered in foreground of the floor. An fps counter should always be rendered in from of the game world. In an orthographic perspective the player might be rendered in front or in the back of a tree depending on his position.
The rendering order is influenced by the following parameters:
-
drawOrder property provided by all drawing options. This property is the most powerful tool to specify the drawing order of all drawing tasks. Default value is 0.
-
entity system order When no drawOrder is specified, the execution order of the
EntitySystemwill automatically set an offset to the drawing order. Every value in theOderenum is spaced by 1,000,000 from another. Drawing tasks are therefor executed in order of the execution order of theEntitySystem. -
call order Multiple drawing tasks with the same drawing order from within the same
EntitySystemwill be executed in the order of code execution. -
z-index To support sorting within the same draw order
SpriteDrawOptionsprovide this secondary sorting parameter. The z-index will automatically be set when settingisSortOrthographic=truein theRenderComponent. Of cause you can also specify custom values.
Best practices for drawing order:
-
Specify the execution order of the entity system that you are working on accordingly. E.g. use
Order.PRESENTATION_UIwhen the system handles ui rendering. -
Simply order your drawing calls within a method in the correct order.
-
Specify draw order when necessary and avoid it otherwise.
-
If you want to create drawing tasks across multiple execution orders specify the draw order and use the mixin function to calculate draw order value from another execution order.
-
Use the maximum vertical y position as z-index or use the built in
RenderComponentmechanism when handle orthographic rendering.
Use this examples for a better understanding:
| execution order | specified order | resulting order | call order | z-Index | actual rendering order |
|---|---|---|---|---|---|
Order.PRESENTATION_WORLD | 0 | 7,000,000 | 1 | - | 1 (lowest resulting order) |
Order.PRESENTATION_WORLD | 1 | 7,000,001 | 1 | - | 2 |
Order.PRESENTATION_WORLD | 2 | 7,000,002 | 1 | - | 3 |
Order.PRESENTATION_WORLD | 2 | 7,000,002 | 2 | 50 | 5 |
Order.PRESENTATION_WORLD | 2 | 7,000,002 | 2 | 40 | 4 (because of lower z-Index) |
Order.PRESENTATION_LIGHT | 25 | 9,000,025 | 1 | - | 6 |
Order.PRESENTATION_LIGHT | 25 | 9,000,025 | 2 | - | 7 (second drawing call with same order and z-index) |
Drawing across different execution orders needs calculating the order of the drawing call manually.
To do so simply use the helper method from the Order enum:
// will result in a draw order 1 above the light layer
int drawOrder = Order.PRESENTATION_LIGHT.mixinDrawOrder(1);
canvas.drawLine(line, LineDrawOptions.color(RED).drawOrder(drawOrder));
Sprites and Frames
By far the most important class when adding graphics to your game will be sprites.
A Sprite is a still or animated image.
The single images contained in a Sprite are frames.
Every frame can use an individual showing duration.
The sprite will be rendered as infinite loop of it's frames.
Any sprite will need at leas one Frame.
To create a sprite add one ore more resource images into your src/main/resource folder and load the image as shown
below.
Also you can use any sprite from the SpriteBundle (see Asset Bundle) to get started right
away.
If you just need a placeholder image there is a special method to create a prototype sprite in any specified size.
// create a sprite with a single image
Sprite player = Sprite.fromFile("player.png");

// create an animated sprite from a single image
Sprite playerWalking = Sprite.animatedAssetFromFile("player_walking.png", Size.square(16), Duration.ofMillis(100));

// use a pre defined sprite shipped with the engine
Sprite dot = SpriteBundle.DOT_RED.get();

// create a 10x40 pixels placeholder graphic
Sprite placeholder = Sprite.placeholder(Color.RED, Size.of(10, 40))
Sprites should only be created once and be reused when possible. This will reduce cpu load an waiting times, especially when using shaders. Background loading is also supported using Assets.
Graphics
The Graphics class itself provies access to the submodules but also adds a huge number of useful functions:
// returns list of supported resultions on the current os
graphics.supportedResolutions();

// returns list of supported font names on the current os
graphics.availableFonts();

// maps the position on the `Screen` to a position in the world
// also works when using split screen!
Vector worldPosition = graphics.toWorld(Offset.at(10, 20));

// enable split screen (see guide)
engine.graphics().enableSplitScreenMode(options);
Configuration
Graphics.configuration() will allow customizing system load and quality.
Options that can be specified:
| Option | Default | Description |
|---|---|---|
| resolution | 1280:720 | window resolution, also screen resolution when using fullscreen |
| isFullscreen | false | enable or disable fullscreen mode |
| useAntialiasing | false | enable or disable antialiasing (performance heavy when drawing shapes) |
| isAutoEnableLight | true | auto enable light when interacting with light |
| lightQuality | 0.25 | specify the quality and performance impact for lights and shadows |
| isLightEnabled | false | use light (will make screen black when no light source is present) |
| isLensFlareEnabled | true | specify, if light glow effects can cause lens flares on the camera |
| isIndirectLightEnabled | true | specify, if indirect light will be cast when light hits occluders (expensive) |
| lightBlur | 3 | specify the blurring of the light map |
| lightFalloff | 1.0 | specify how lights will blur to darkness |
| backgroundColor | BLACK | specify the background color of the screen |
| overlayShader | - | specify a shader that is used on every sprite drawn |
| shockwaveCellLimit | 10,000 | cell count limit used for rendering shockwaves. Higher values result in better graphics but reduced performance |
| lightBounceIntensityLoss | 0.1 | sets the loss of light intensity when it bounces of an occluder |
| lightBounceLengthLoss | 0.2 | sets the loss of light length when it bounces of an occluder |
| indirectLightIntensity | 0.9 | specify the intensity of indirect light that is cast when light hits occluders |
| indirectLightDiameter | 16 | sets the diameter of indirect light rays. |
| maxLightBounces | 2 | specify the maximum number of consecutive bounces that light will make when hitting occluders |
Currently there is no way to preserve the configuration when quitting the game. If you need this please tell me by commenting on https://github.com/srcimon/screwbox/issues/439.
Canvas
Use the Graphics.canvas() to draw directly to the screen.
Every frame the Canvas will be cleared again.
So every drawing task has to be repeated in every frame.
The Canvas has a lot of distinct drawing methods available.
Most of this drawing methods use an option object that contains all drawing options for the specific task.
This limits the number of parameters for the drawing method.
These option classes are immutable and use a builder pattern.
See examples:
// will fill the whole canvas with red
canvas.fillWith(Color.RED);

// will draw a small half transparent white rectangle
canvas.drawRectangle(Offset.at(10, 20), Size.of(10,4), RectangleDrawOptions.filled(Color.WHITE.opacity(0.5));

// will draw the player sprite image using double size
canvas.drawSprite(player, Offset.at(100, 10), SpriteDrawOptions.scaled(2));
World
The Graphics.world() is similar to the Canvas but provides methods that can be used to simplify drawing
by using world coordinates instead of screen coordinates.
Using World is also recommended when using Split screen.
World uses the Camera to bind a world to screen coordinates.
Screen
The Graphics.screen() can be used to setup the actual drawing area on the game Window.
Also the Screen allows rotating the whole viewport.
This will result in a huge performance drop but may create some nice effects.
This is also used by the camera shake to apply the swing effect.
Camera
Screwbox uses a viewport concept.
Within the game there is at least one viewport that has individual camera control.
Enabling split screen will create new viewports.
The camera of each viewport can be controlled individually.
To receive the current camera use engine.graphics().camera().
Automatic camera control
The simplest way to move the camera within the game world is to simply attach the camera to an entity.
This can be done by adding a CameraTargetComponent to the entity.
By changing the viewportId property you can select the target viewport for the camera.
This is only relevant when using split screen.
To restrict the camera movement within a certain area, add a new entity containing a TransformComponent to specify the
area and a CameraBoundsComponent.
Don't forget to enable processing of the CameraTargetComponent by calling environment.enableAllFeatures().
Manual camera control
You can also obtain manual Camera controls using engine.graphics().camera().
This allows some more specific controls like changing zoom or instant movement to a specified position.
Sadly you cannot set any zoom value.
This is due to zoom restriction which can also be changed via Camera,
but also pixel perfect mechanism that is in place to prevent graphic glitches.
Camera shake
Camera also allows setting of a short or infinite shake effect.
The method uses the specified CameraShakeOptions to apply the effect.
See example code:
camera.shake(CameraShakeOptions
    .lastingForDuration(Duration.oneSecond())
    .strength(4)
    .ease(Ease.SINE_IN_OUT)
    .swing(Rotation.degrees(10)));
The shake effect won't affect the position of the Camera.
To receive the actual position including the camera shake use camera.focus().
Light
You can also add light to the game scene by adding lights manually or automated.
When adding your first light or occluder this will result in automatically activating light rendering which
could lead to a black screen when the light is currently not in the viewing area.
To avoid this you can disable the auto activation using the GraphicsConfiguration.
To add lights manually use Graphics.light().
This class also allows specifying the ambient light value that can be important when you only want to add a
little dynamic to the scene without darken it too much.
You can use the Light class directly for adding lights and shadows:
graphics().light().addPointLight(position, 40, Color.BLACK);
The following types of lights and occluders are supported:
| Type | Description |
|---|---|
| cone light | a directed light cone that will be affected by occluders |
| cone glow | a directed cone glow effect |
| point light | a radial light source that will be affected by occluders |
| spot light | a radial light source that won't be affected by occluders |
| directional light | light source that emitts light from from a line |
| backdrop occluder | area that cast shadows on the background |
| occluder | area that cast shadows and also can block lights when rendered on top |
| orthographic wall | an orthographic wall that can be illuminated but will cast shadows (used in common rpg perspective) |
| area light | a area light effect |
| area glow | a area glow effect |
| ambient light | specifies maximum darkness of the whole screen |
| light glow | a glow effect that doesn't illuminate the area |
It's highly recommended to add the StaticOccluderComponent to any shadow casting entity that will not move to
massively
improve rendering performance.
The recommended way to add light to your scenes is by using the corresponding components of the ecs. See Components Overview.
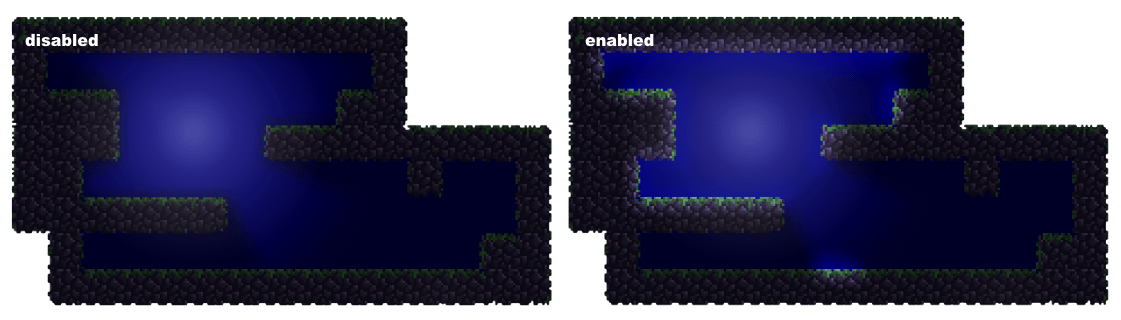
Indirect lighting
Spot lights and cone lights will cast indirect light when bouncing off occluders.
Indirect light is active by default, but it can be heavily customized or disabled using the corresponding GraphicsConfiguration options.
Using indirect light helps illuminating occluders and to set the mood of the game scene but it's also quite heavy on the fps.
You can see how indirect light plays a role in this image comparison:
On light colors
Creating light in a 2D Java game engine was not an easy task. Light is created by drawing a separate transparent image with the black gradient shapes. Which is then inverted, blurred and scaled to create some kind of immersive light effect.
This is not how light works at all in the real world or any other game engine I know. So to avoid graphic glitches it is recommended to draw only black light sources. (With exception of glow lights, which are actually drawn on top of the image.) Any other color might work but may result in some quite ugly graphics. This is kind of strange and will likely change in the future.
Creating immersive light sources
To create really immersive light sources, the combination of distinct light components might be very useful. For example:
- Add a
PointLightComponentto create the basic light source which creates dynamic shadows. - Add a
SpotLightComponentto also lighten areas that would otherwise be not visible at all. - Add a
GlowComponentto highlight the light source. - Add a
LensFlareto theGlowComponentto create some basic reflections on the screen. - Leave indirect light enabled and tune it using the correspondig
GraphicsConfigurationoptions.
Post processing
Post-processing allows you to apply one or more PostProcessingFilter to the entire screen or each split screen viewport.
This can create stunning effects, but applying such a filter significantly slows down the rendering process because the entire screen is copied to the graphics card multiple times.
Therefore, post-processing filters operate directly on the Graphics2D target, bypassing the convenience of using the canvas API provided by ScrewBox.
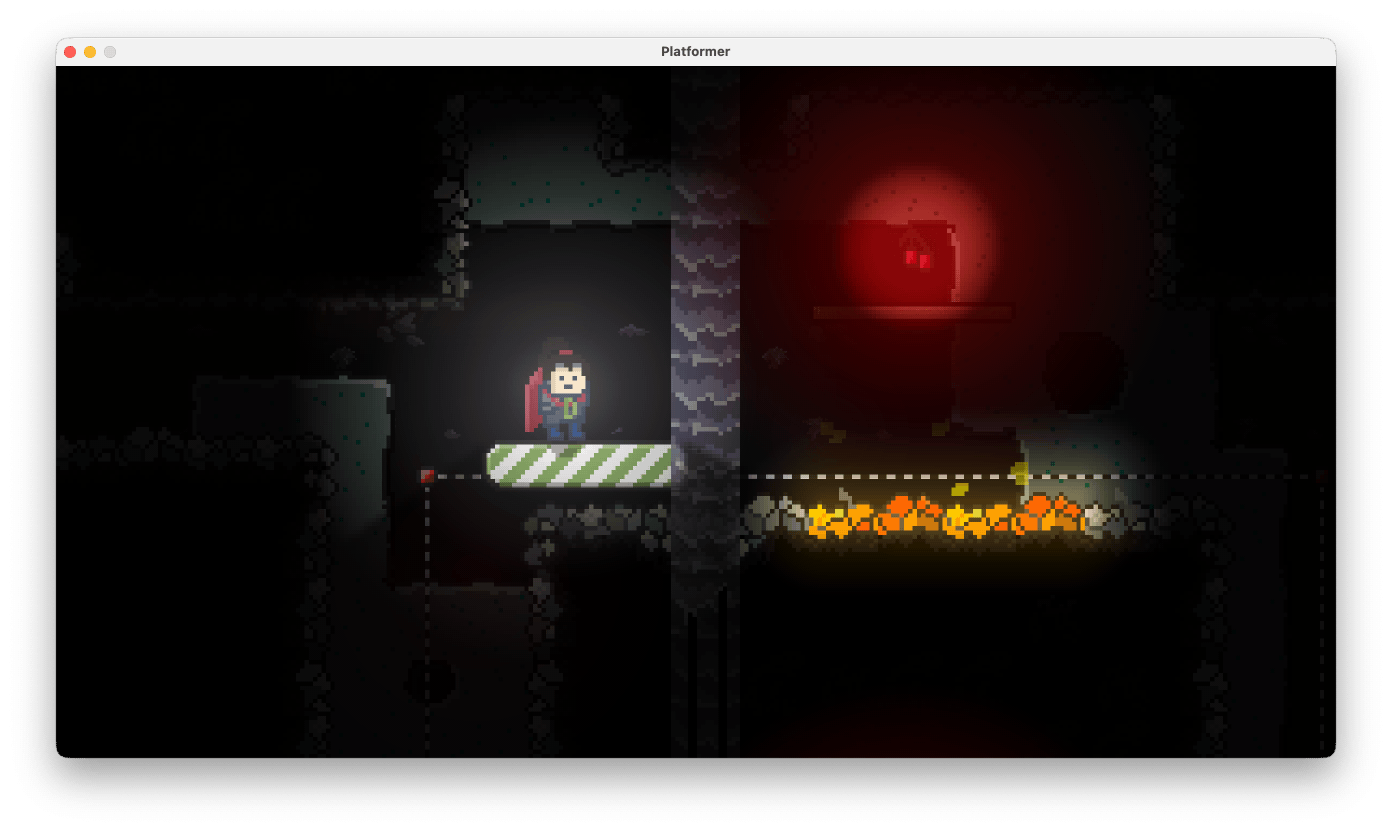
A special post processing filter can crate shock wave effects as can be seen in the screenshot. The post processing interface provides some easy to use methods to create multiple shock waves with a single filter that is created and applies whenever a shockwave is visible.
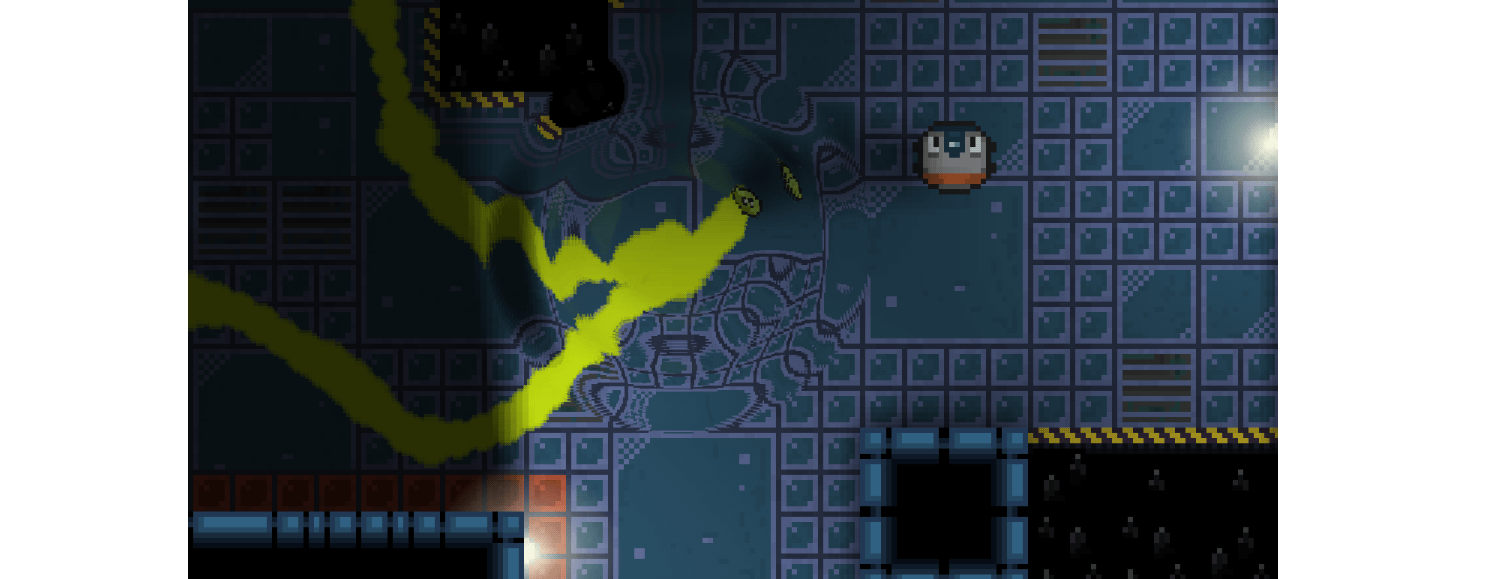
// add a deep see effect on the screen
postProcessing.addScreenFilter(new DeepSeaPostFilter());

// create a shockwave at position 10:20
postProcessing.triggerShockwave($(10, 20), ShockwaveOptions.radius(40));
Advanced topics
Automate drawing using the ecs
The recommended way to draw Sprites in your game is by adding a RenderComponent to your game entities.
The rendering of entities using this component is massively optimized for best performance and will also support
reflection effects using the ReflectionComponent.
This example code will add a red image attached to the mouse cursor.
engine.environment()
    .enableRendering()
    .addEntity(new Entity("animated cursor")
        .add(new RenderComponent(SpriteBundle.DOT_RED))
        .add(new TransformComponent())
        .add(new CursorAttachmentComponent()));
Reflections
To add reflections simply add a ReflectionComponent to any entity that will act as a mirror and reflect everything
above.
Only entities using the RenderComponent will be reflected.
The ReflectionComponent also supports to different kinds of animation: projection and postfilter.
Shaders
When rendering a Sprite using the RenderComponent or by manual drawing on the Canvas you can specify
SpriteDrawOptions to customize the drawing process.
SpriteDrawOptions allow scaling, rotating, flipping the drawing.
But they also allow specifying a Shader.
Shaders will create animated images from any source (animated or still).
They have their own customization class named ShaderSetup to customize the animation.
ScrewBox ships some pre defined shaders. (See Shaders).
Shaders will animate the sprite on the fly, but will reuse the calculated images once they are created.
This process is quite cpu heavy and should be done upfront before entering a Scene.
To prepare a shader upfront use compileShader.
So to animate your cursor from the example code just add the shader:
var sprite = SpriteBundle.DOT_RED.compileShader(ShaderBundle.IRIS_SHOT);
var options = SpriteDrawOptions.originalSize().shader(ShaderBundle.IRIS_SHOT);

engine.environment()
    .enableRendering()
    .addEntity(new Entity("animated cursor")
        .add(new RenderComponent(sprite, options)
        .add(new TransformComponent())
        .add(new CursorAttachmentComponent()));
Some examples for a still image animated using shaders. For a complete reference see Shaders.


Auto tiling
Auto tiling uses a predefined set of sprites to automatically detect the correct sprite for a certain tile in your game
map.
Auto tiling is quite easy when using an TileMap for creating your level or prototype.
First of create your AutoTile by copying one of the auto tile layout templates into your own game resources.
Currently there are two layouts available:
| Layout | Preview |
|---|---|
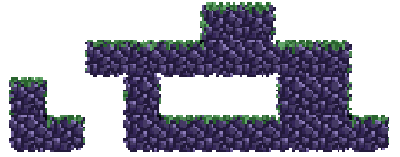
| 2x2 layout using less layout using 16 sprites (download) |  |
| 3x3 detailed layout using 47 sprites (download) |  |
Then paint on that sprite sheet and create an AutoTile using the Layout matching the template you used.
To get the sprite just query the AutoTile you are using with a auto tile index from the TileMap.Tile.
If you want to experiment with that feature you can also use one of the pre packed auto tiles using AutoTileBundle.
It is also possible to update sprites during runtime by adding an AutoTileComponent to your entity.
But you can easily create a mask on your own by specifying an on predicated to test if a tile is connected.
final var mask = AutoTile.createMask(tileOffset,
    location -> entry.getValue().equals(directory.get(location)));
final var map = TileMap.fromString("""
        ##
     #######
   #  #   ##
   ## #######
   """);

environment.importSource(indexedSources(map.tiles(), TileMap.Tile::value)
    .assign('#', tile -> new Entity()
        .bounds(tile.bounds())
        .add(new RenderComponent(tile.findSprite(AutoTileBundle.ROCKS))));
The above code example will result in a map looking like: